

How to Test LEDs for Functionality, Color, Brightness and Uniformity
LEDs, light emitting diodes, emit light when an electric current passes through them in the correct direction. In LED installations, current limiting resistors are necessary in a series to prevent LEDs from being permanently destroyed by high currents. They are often used in many electronic devices due to their low power and voltage requirements, and high efficiency.
An LED's plastic body does not determine its color; instead, its color is determined by the semiconductor material used to construct it. Thus, some LEDs may come with translucent or milky bodies and their colors will not be discernible until they are lit.
Video Product Inc's LED Tester provides a quick and easy solution to checking the color, relative brightness, uniformity and functionality of any LEDs.
Materials needed:
- VPI's LED Tester (Part #: TESTER-LED)
- LED lights
- 9V battery
Instructions:
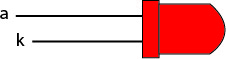
First, determine the Anode (a) and Cathode (k) sides of the LED light. The longer leg is the anode and the shorter leg is the cathode.
Power up the LED tester by inserting the 9V battery into the back of the unit. Replace the cover and hit the “Test” button on the right. The green LED labeled “Batt” on the left side should light up, indicating that the battery works. If it does not light up, try substituting it with a known good battery.
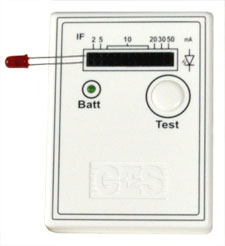
The LED tester provides a range of currents to test the LEDs in: 2 mA, 5 mA, 10 mA, 20 mA, 30 mA, and 50 mA. The 10 mA current has seven available slots while the rest have one each. The brightness of an LED is proportional to the amount of direct current that flows through the LED. Hence, the more current flowing through the LED, the brighter it will be. The LED tester can be used to determine the optimal current that passes through the LEDs for a desired brightness level in an installation.
Test each LED in the preferred current slot by sliding the anode (longer leg) into the top slot and the cathode (shorter leg) in the bottom slot corresponding to the current desired. It is important to put the legs in the correct slots as the LED will not function otherwise, even if it is in optimal condition.
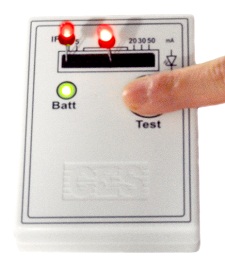
Press and hold the “Test” button and see if the LED lights up. Multiple LEDs can be tested at one time in different current slots to compare their relative brightness at different currents.
About Video Products Inc:
Video Products Inc (VPI), based in Aurora, OH (USA), is dedicated to supplying the highest quality connectivity products to integrators, distributors, IT professionals, and tech-savvy home-users. VPIs product line includes a wide variety of monitor testers, cables, adapters, switches and splitters. All products are rigorously tested and are backed with a one-year warranty on all parts and labor, and a 30-day satisfaction guarantee. For more information, visit www.vpi.us.
Follow us